If you have never used Remote Desktop, it is a really great way to connect to another PC (office, home, etc) remotely and get work done that you otherwise could not get done. I routinely use remote desktop to connect to servers at our office, connect to user’s computers to provide tech support, and to connect to my personal computer at home to access files.
In order to use Remote Desktop, there are a couple of things you need to understand. First off, remote desktop only works with Windows XP and Windows 2003. What I mean by this is that you can only connect INTO a Window XP or 2003 machine. You can use a Windows 98, ME, or 2000 to connect INTO a Windows XP or 2003 machine, but you cannot connect INTO a 98, ME or 2000 machine remotely. If you want to be able to connect to a Windows 2000 or earlier machine, you’ll have to buy commerical software.
Secondly, you need to make sure that you are logged in as a computer administrator on the machine in order to set it up for remote access. If you brought a computer from a store or got it straight from the manufacturer, the first user name you create is always an Administrator account.
 An easy way to check whether or not you are an Administraor is to go to Start, Control Panel and then click on User Accounts. You’ll see your user name and it should have “Administrators” or “Computer Administrator” written next to it.
Thirdly, the administrator account on your machine must have a password. If you do not have to type in a password in order to access Windows when you start up your computer, then you do not have a password set up and Remote Desktop will not work. Remote desktop does not allow you to connect to a computer with a user name that does not have a password.
When you go to User Accounts, you will see an option to create a password for the account. Go ahead and do that.
Next, if the computer you are connecting to is running Windows XP SP2 (which it most likely will be), then you need to open the firewall to allow remote desktop connections. To do this, go to Start, Control Panel, Windows Firewall and click on the Exceptions tab.
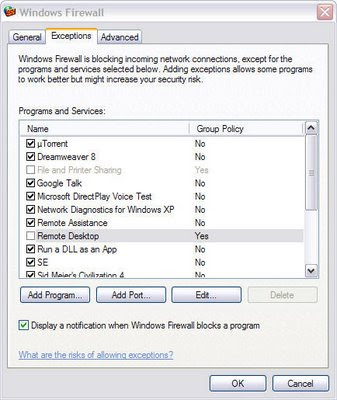
Make sure that the Remote Desktop checkbox is checked. Don’t worry about how my screen looks, it’s part of a corporate network. You should have a lot less entries and one of them should be Remote Desktop. Check it and then click OK.
The last thing that needs to be done in order for Remote Desktop to work correctly is to tell Windows that we want to allow users to connect. So far we’ve just fulfilled the requirements, but now we have to actually allow remote desktop connections to this computer.
Go to Start, Control Panel, and click on System. Click on the Remote tab and make sure that the “Allows users to connect remotely to this computer” is checked.

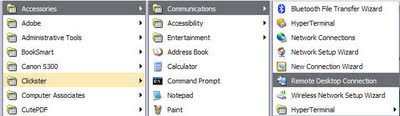
And that’s it! Your computer is now setup to connect to! First try connecting to the computer while on the same network…as in if you are at home, try connecting to the computer from another computer on your home network. In order to connect, go to the other computer and click on Start, All programs, Accessories, Communications, and Remote Desktop Connection.
In the dialog box, you can type in the IP address or the name of the computer. The best way to connect is to type in the IP address of the computer. In order to get the IP address of the computer you want to connect to, go to the computer and click on Start, Run and type in CMD.
 In the black command window, type in the word “ipconfig” without the quotes as shown below and press Enter.
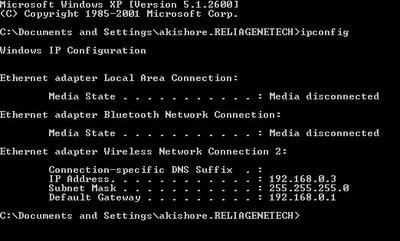
You’ll see your IP address listed along with some other info, but you don’t need to worry about that. Write down that IP address (192.x.x.x or something similar) and type that number exactly into the remote desktop text box on the other computer (the computer you are connecting from).

Click Connect and you should get a login screen pop up, which means you have successfully connected to the other computer. You can now enter the Computer Administrator user name and password.
If you get an error saying that computer cannot accept new connections, etc. that means something was not configured correctly. Remember you need to give the administrator account a password, open the port in the firewall, and check the allow remote connections checkbox in the System properties. All of these three things you need to do on the computer you want to connect TO.
Once you are able to connect from within the same network, now you can try to connect from the outside. So if you want to connect to your home computer from the office, you can do that, but you’ll have to do a few extra things.
First, you have to get your public IP Address (not the 192.168.x.x number) and you can do this by going to the computer you want to connect in to and navigating to the web site http://www.whatismyip.com/ and this will give you your public ip address. This is the address that can be used from anywhere in the world to connect to your specific location and is unique.
The second thing you have to do is open the port in your router (unless you’re connecting your cable modem directly into your computer) and forward that port to the computer you want to connect to. Here’s how you would do this on a Netgear router (as I have that) and is pretty much the same for other routers. Most manufacturer’s web sites have an article on how to configure their particular router for remote desktop since it’s very common.
You’ll need to log into your router by typing it’s IP address into the IE address bar. You can figure out the IP address of your router by going to any computer on your network (that you want to connect into) and opening the command prompt like we did above and typing ipconfig again. In addition to the IP Address field, you’ll also see Default Gateway, this is your router.
Type that address into your IE address bar as follows and press Enter:

You’ll most likely be prompted for a user name and password. Usually, you can find this in the documetation or on the under side of the router itself. For my Netgear router, the username as “admin” (lowercase) and the password was “password”.
Once you’re in, you should see an option called “Port Fowarding/Port Triggering” or something very similiar. I knew Netopia calls these “Pinholes” and on Linksys it might be called a “Service”.
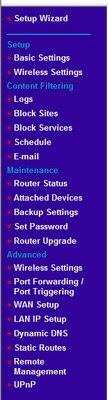
Once you’re on the Port page, choose Port Triggering (if you see Remote Desktop in the list of services, you can choose that instead, but it may not be there). Now we’ll add the service for Remote Desktop. Click Add Service.

The next part may look hard, but it’s not really too bad once you understand what everything does. The service name can be anything, so type in “RemoteDesktop“. For the Service User, you can choose Any or Single Address. We want to choose single address because we want to connect into just one computer. Type in the IP address of your computer into the space provided. Again, that is what we already got earlier from the ipconfig command.
For the service type, choose TCP protocol. Now for “Triggering Port, Starting Port, and Ending Port” put in 3389. Port 3389 is the port Windows uses to connect using remote desktop.
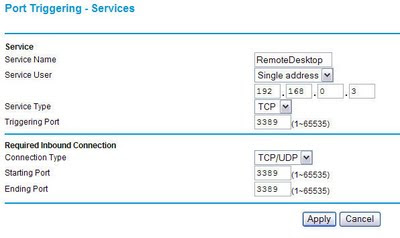
Click Apply and you’re done! You should now be able to use your public IP address (type this into the “Computer” textbox in the Remote Desktop software) to connect through your router to your computer!
In order to use Remote Desktop, there are a couple of things you need to understand. First off, remote desktop only works with Windows XP and Windows 2003. What I mean by this is that you can only connect INTO a Window XP or 2003 machine. You can use a Windows 98, ME, or 2000 to connect INTO a Windows XP or 2003 machine, but you cannot connect INTO a 98, ME or 2000 machine remotely. If you want to be able to connect to a Windows 2000 or earlier machine, you’ll have to buy commerical software.
Secondly, you need to make sure that you are logged in as a computer administrator on the machine in order to set it up for remote access. If you brought a computer from a store or got it straight from the manufacturer, the first user name you create is always an Administrator account.
 An easy way to check whether or not you are an Administraor is to go to Start, Control Panel and then click on User Accounts. You’ll see your user name and it should have “Administrators” or “Computer Administrator” written next to it.
Thirdly, the administrator account on your machine must have a password. If you do not have to type in a password in order to access Windows when you start up your computer, then you do not have a password set up and Remote Desktop will not work. Remote desktop does not allow you to connect to a computer with a user name that does not have a password.
When you go to User Accounts, you will see an option to create a password for the account. Go ahead and do that.
Next, if the computer you are connecting to is running Windows XP SP2 (which it most likely will be), then you need to open the firewall to allow remote desktop connections. To do this, go to Start, Control Panel, Windows Firewall and click on the Exceptions tab.

Make sure that the Remote Desktop checkbox is checked. Don’t worry about how my screen looks, it’s part of a corporate network. You should have a lot less entries and one of them should be Remote Desktop. Check it and then click OK.
The last thing that needs to be done in order for Remote Desktop to work correctly is to tell Windows that we want to allow users to connect. So far we’ve just fulfilled the requirements, but now we have to actually allow remote desktop connections to this computer.
Go to Start, Control Panel, and click on System. Click on the Remote tab and make sure that the “Allows users to connect remotely to this computer” is checked.

And that’s it! Your computer is now setup to connect to! First try connecting to the computer while on the same network…as in if you are at home, try connecting to the computer from another computer on your home network. In order to connect, go to the other computer and click on Start, All programs, Accessories, Communications, and Remote Desktop Connection.

In the dialog box, you can type in the IP address or the name of the computer. The best way to connect is to type in the IP address of the computer. In order to get the IP address of the computer you want to connect to, go to the computer and click on Start, Run and type in CMD.


You’ll see your IP address listed along with some other info, but you don’t need to worry about that. Write down that IP address (192.x.x.x or something similar) and type that number exactly into the remote desktop text box on the other computer (the computer you are connecting from).

Click Connect and you should get a login screen pop up, which means you have successfully connected to the other computer. You can now enter the Computer Administrator user name and password.
If you get an error saying that computer cannot accept new connections, etc. that means something was not configured correctly. Remember you need to give the administrator account a password, open the port in the firewall, and check the allow remote connections checkbox in the System properties. All of these three things you need to do on the computer you want to connect TO.
Once you are able to connect from within the same network, now you can try to connect from the outside. So if you want to connect to your home computer from the office, you can do that, but you’ll have to do a few extra things.
First, you have to get your public IP Address (not the 192.168.x.x number) and you can do this by going to the computer you want to connect in to and navigating to the web site http://www.whatismyip.com/ and this will give you your public ip address. This is the address that can be used from anywhere in the world to connect to your specific location and is unique.
The second thing you have to do is open the port in your router (unless you’re connecting your cable modem directly into your computer) and forward that port to the computer you want to connect to. Here’s how you would do this on a Netgear router (as I have that) and is pretty much the same for other routers. Most manufacturer’s web sites have an article on how to configure their particular router for remote desktop since it’s very common.
You’ll need to log into your router by typing it’s IP address into the IE address bar. You can figure out the IP address of your router by going to any computer on your network (that you want to connect into) and opening the command prompt like we did above and typing ipconfig again. In addition to the IP Address field, you’ll also see Default Gateway, this is your router.
Type that address into your IE address bar as follows and press Enter:

You’ll most likely be prompted for a user name and password. Usually, you can find this in the documetation or on the under side of the router itself. For my Netgear router, the username as “admin” (lowercase) and the password was “password”.
Once you’re in, you should see an option called “Port Fowarding/Port Triggering” or something very similiar. I knew Netopia calls these “Pinholes” and on Linksys it might be called a “Service”.

Once you’re on the Port page, choose Port Triggering (if you see Remote Desktop in the list of services, you can choose that instead, but it may not be there). Now we’ll add the service for Remote Desktop. Click Add Service.

The next part may look hard, but it’s not really too bad once you understand what everything does. The service name can be anything, so type in “RemoteDesktop“. For the Service User, you can choose Any or Single Address. We want to choose single address because we want to connect into just one computer. Type in the IP address of your computer into the space provided. Again, that is what we already got earlier from the ipconfig command.
For the service type, choose TCP protocol. Now for “Triggering Port, Starting Port, and Ending Port” put in 3389. Port 3389 is the port Windows uses to connect using remote desktop.

Click Apply and you’re done! You should now be able to use your public IP address (type this into the “Computer” textbox in the Remote Desktop software) to connect through your router to your computer!
Comments
Post a Comment